5 Python Environments (Using Anaconda)
Understanding Computing Environments in Python
Background Information
Python is a popular programming language for scientific computing. It’s great, but it only contains very basic functions on its own. Even seemingly simple functions, like computing the mean, require separate libraries like Numpy that we need to download and import. When we download a library, its code will often require other libraries, called dependencies because the library we want depends on another library. And of course, each dependency likely has its own dependencies, and so on. This is complicated enough on its own, but you will likely encounter a dependency collision at some point in your programming journey. For example, you want Library-A for one project, and Library-B for another project. Library-A requires Library-C (version 2), but Library-B requires Library-C (version 1)! This collision cannot be managed on its own. The solution is to create a new Python environment for each project.
A python environment is like “walling off” a separate version of Python for each project. You can think of an analogy to an apartment building. Each apartment has its own furniture, dishes, etc. You might like modern styles and your neighbor might prefer mid-century, but because each apartment has its own walls, your neighbors’ style choices don’t affect you. Similarly, a Python environment will contain only the libraries that are needed for a specific project, so the dependency collisions from other projects are no longer a concern.
Although there are several options for managing Python environments, the most common ones are venv and conda. This chapter will focus on conda, along with the other tools of the Anaconda distribution because we find that this system is the easiest to use, and also allows us to download new libraries, and provides us with an intuitive interative developer environment (IDE) called Spyder.
When working on different types of code, even within the same project or experiment, it is considered best practice to create a new environment for each distinct task. Each environment is a separate “apartment” where your Python code lives. This separation is important because every tool or package you add to your project relies on other tools, called dependencies, in order to properly function. By isolating these dependencies through the creation of separate environments, “apartments”, developers can reduce the chances that these dependencies will clash with one another which can cause errors in your code. Environments help maintain organization and efficiency. The steps for creating a new environment will differ depending on the programming language and management software you are using.
Creating an Environment
Determining Current Environments
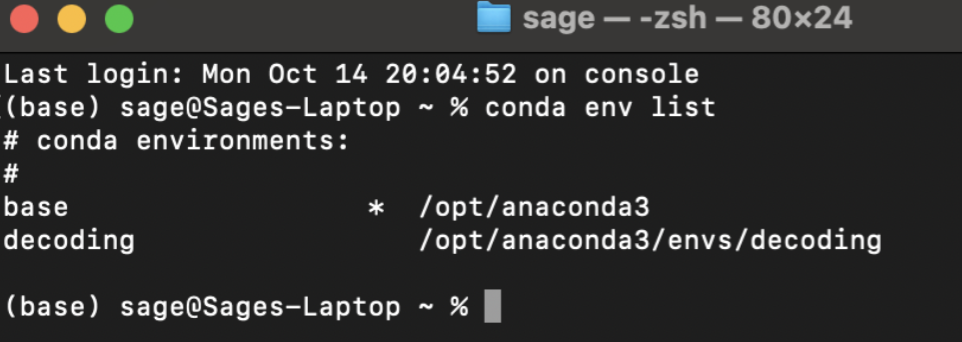
Ensure that Anaconda is installed on your computer. You can verify this by looking for the word (base) at the terminal prompt. (base) at the left of your terminal denotes the default environment. If you are not sure which environments are on a particular machine, you can type conda env list into the terminal to view which environments have been previously installed on the computer you are working on.
 (VCL, 2025)
On Sage’s computer you can see that the only environment other than the default, base, that has been installed is called decoding.
To create a new environment, you can use the command template:
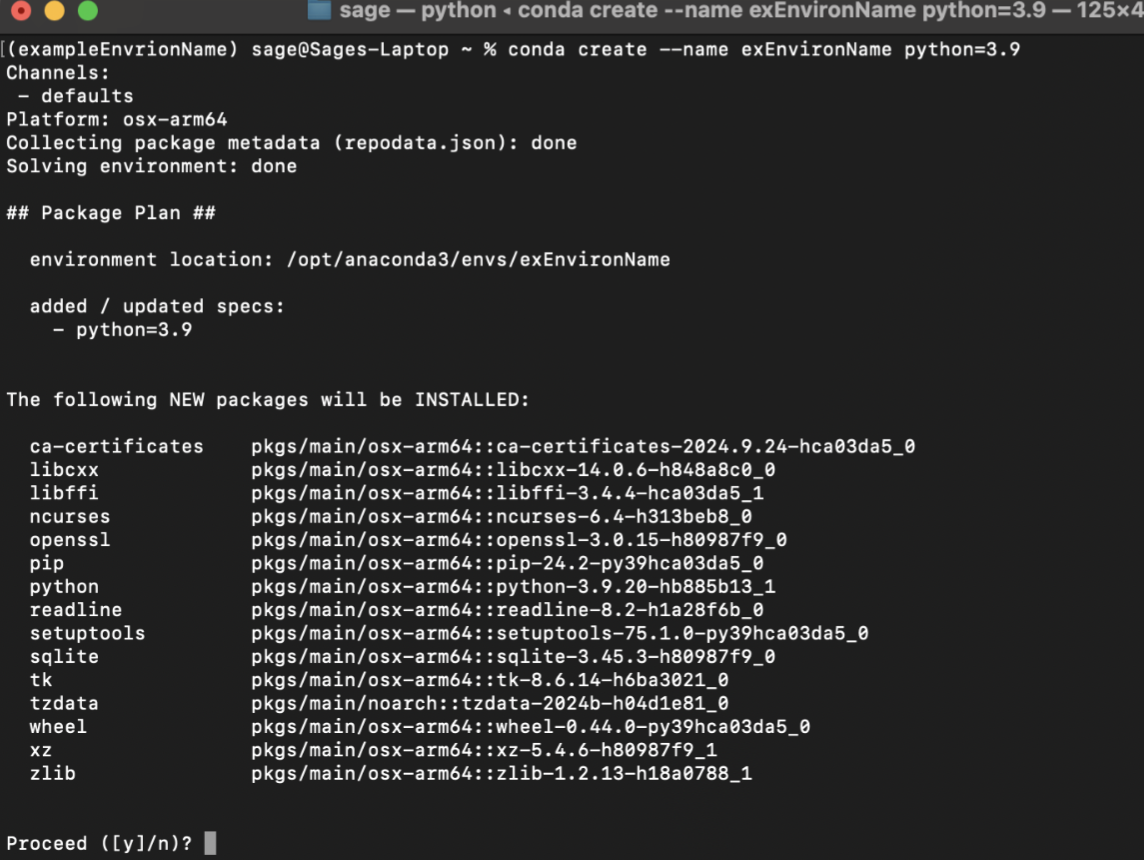
conda create --name example_name
In this command, conda refers to Anaconda. create instructs the computer to generate a new environment. The --name flag labels the following text as the name of the environment. Alter the name so that it provides context for the purpose of the environment you are creating rather than example_name. Optionally, one can specify the version of Python to be used in this environment (e.g., python=3.9). If you don’t specify a Python version, then the most recent one will be used as the default. You should check whether your libraries support this version, and if they do not, it’s best to choose the most recent version that supports your work. Once you type this command into the terminal and press Enter, the terminal will display a list of packages that will be installed, corresponding to the Python version you have selected.
Once you click enter, the terminal will list the packages that will be downloaded.
 (VCL, 2025)
Activating Environments
In order to use your new environment, you need to activate it. Input the following command into your terminal: conda activate example_name. Replace example_name with the name of the environment you are activating. Upon activation, you should see the switch on your terminal screen from the default (base) environment to the name of the environment that you just activated. In this case (example_name).
 (VCL, 2025)
If you want to deactivate the environment at any time type: conda deactivate into the terminal.
Downloading Python Libraries
Upon environment activation, you will need to download the libraries needed for the project you are working on. You may know which libraries you need right away. If so, great! Inside of Anaconda, it’s often best to use conda to install those libraries. Conda will manage any of this library’s dependencies. The general format for installing a library is: conda install library_name where you would replace library_name with the specific library you want. While this will work well for most major libraries, some newer or more specialized libraries may need to be downloaded from a specific channel. In these cases, it’s often best to do a web search for “conda install
In other cases, you might be working with a script you inherited from another programmer. In these cases, look at the top of the Python script (or throughout the script, depending on how the developer organized their code) there will be different import and from statements. import and from are keywords that indicate that the script needs specific libraries or packages in order for the code to run.
For example, you may see a line of code that looks like this in a script: from scipy.io import loadmat
In this example, scipy is the library, io is the class, loadmat is a function within the class. This denotes that in order for this script to work, you need to import the scipy library.
To install a library, use the following command format: conda install scipy
After installing all the needed libraries, a list of dependencies will appear on the screen and ask for your consent to install them. Type “y” to consent.
Creating and Managing Conda Environments
If you are collaborating with others, it is helpful to have identical environments installed on multiple machines. You can “clone” an environment to provide your collaborator with a list of the exact set of packages on your machine. A YAML file is a type of text file often used for configurations that can be used to clone environments.
A YAML file contains a list of all the packages installed in a given environment. This allows another developer to use the environment without building it from scratch, and wondering if their package versions are the same as yours.
To create a YAML file for your current Anaconda environment, enter the following command in your terminal:
conda env export --no-builds > environment_name.yml
This command creates a file named environment_name.yml in the current directory. The --no-builds flag is optional, but it makes your YAML file more portable between operating systems by omitting computer-specific build information.
To create a new environment from this YAML file on another machine, use:
conda env create -f environment_name.yml
If you release your code on Github (see Chapter X), it’s a good practice to include a YAML file of your environment so others can reproduce and build from your work.
Recommended Packages
In most environments, especially those used for data analysis or visualization, you’ll want to install:
Matplotlib for plotting graphs:
conda install conda-forge::matplotlib
Pandas for handling CSV and spreadsheet data:
conda install pandas
Changing Python Environments in Spyder IDE
If you are using the Spyder IDE that comes with the Anaconda distribution, you will need to import a library called spyder-kernels that allows you to switch between environments inside your IDE, which is important as each project will have several different environments.
In your project’s activated environment, type the command: conda install spyder-kernels
Note: This will install the latest version of the spyder-kernels package. Sometimes a specific version of spyder-kernels is needed for your version of Python and Spyder. The computer will output an error message to you if this is the case, instructing you on which version is compatible. For example, if you are told to download version 2.5, you should then type the following into your terminal: conda install spyder-kernels=2.5.
To launch Spyder from the base environment, type: spyder in the terminal.
Additional Helpful Commands
To update a package:
conda update package_name
To list all packages in the current environment:
conda list
To list packages in a specific environment:
conda list -n environment_name
As long as you are in the (base) environment of Anaconda, the default environment, you can launch Spyder. To do so, simply type spyder into the terminal and then press enter.
To view all the libraries downloaded into a specific environment type the command: conda list or conda list -n decoding Replace decoding with the name of the specific environment you are investigating.
Difference between Pip Install and Conda Install
Pip and Conda are both installation commands but contain differences. Pip is limited to installing packages from the Python Package Index whereas conda can install packages from a variety of sources (languages and environment management systems). When installing a package using pip, you install it globally on your computer system. When you install a package using conda, you install it locally in the specific environment specified.
Specific Notes for Within Spyder
On the left side of the lower ribbon, you can see what environment you are currently in. Please see the screenshot below. In the screenshot it shows how you can specify what environment you are in.
 (VCL, 2025)
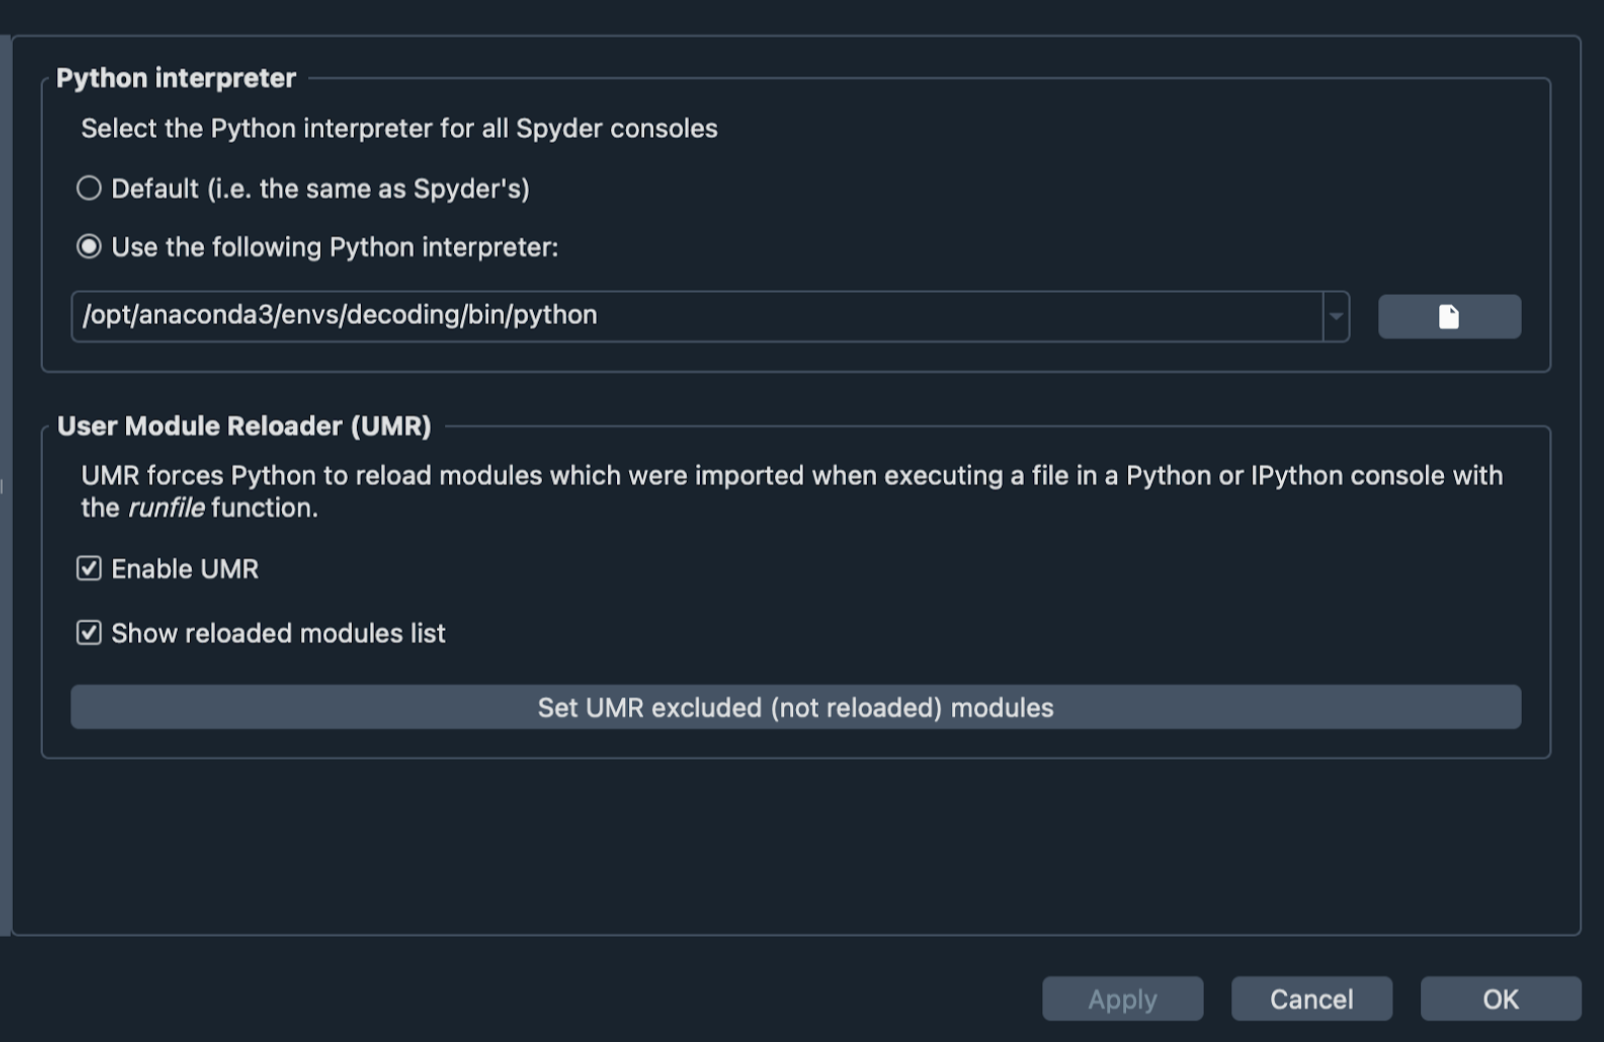
Click and press on the bottom bar where it says conda: decoding (Python 3.9.18) You should then be prompted with a pop up saying “Change default environment in preferences”.
The following pop-up window should appear:
 (VCL, 2025)
Under Python Interpreter click the drop down arrow and you will find all of the environments on your computer. Navigate and click on the environment you want to use.
 (VCL, 2025)
Once selected, make sure you click ok and apply changes.
In Spyder the environment does not update until you restart the kernel. In order to do this, navigate to the “consoles” tab in the top bar and click “restart kernel.”
Troubleshooting within Spyder:
If the kernel does not restart, or you receive an error message upon your attempt to restart it, go back to the terminal, activate the environment and install the version of Spyder Kernels that the computer suggests.
Click control+c if your terminal is not working. This command interrupts the terminal.
Further Reading
We recommend the following sources for more information on this topic:
Package/Dependency Management from MIT’s “Missing Semester” course
Practice Questions
Pip and conda are both installation commands. What are the differences between the two?
Which of the following is the proper command syntax to activate an environment in the terminal? A. conda activate example_name B. environment activate example_name C. environment load example_name
Which of the following is the proper command syntax for updating a package in the terminal?
Using Anaconda in the terminal, what commands would you use to create a new environment named myenv in Python 3.11 and install the packages numpy and matplotlib?